When it's too hot to go out and play, what does one do?
1. Pray for rain
2. Get out the wool.

When designing a new knit, there are a few factors to keep in mind. It must be fun to knit, and it must have an interesting construction that is not too complicated. It should be easy to keep track of where I am without having to count individual stitches. I don't particularly like the initial casting on, so I try to find a way to get started with just a few stitches, and build from there. And I don't want to sew parts together, but there is usually a way around that, after the prototype is completed. I drew up an idea, and made a plan.
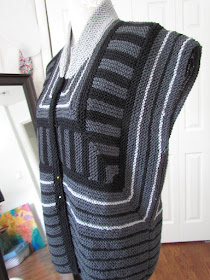
This time around my design begins with the back piece by casting on just 15 stitches. My 50 years of experience has taught me that garter stitch is the ideal way to work out an idea, and that is again my choice here. It can always be altered once the design has been accomplished. The alternating stripes of the dark gray and black form an internal frame with mitered corner blocks at all four points. From there I can pick up stitches along the edge of that frame and work either inward or outward, depending on which edge I begin.
My drawing shows what I want to have happen, but it isn't always so straightforward. There was a lot of un-knitting and re-knitting to get the desired effect. And my initial idea of using two grays, a black and white, ended up without using the white at all.
Here it is on the mannequin, just pinned without the buttons. Nothing like my shawl inspiration but close enough to my drawing to please me. It is a flexible design, because I can easily make it longer by adding more stripes, or wider or narrower and the initial framed stripe section can also change width to suit the size of the wearer. I am off to the races to make this in multiple variations. Of course on the prototype I had to sew the parts together, but I have already figured out how to make this without seams for the next time around. In this example I seamed the fronts to the back at the shoulders and sides, but also joined parts with a three needle bind-off, one of knitting's greatest inventions.
In previous designs, I have added sleeves, which my drawing included, but after trying this on, I decided that this looks great as a cardivest and stopped there. Now I just have to add buttons and weave in a few loose ends and it is finished. I am calling it Pivoting Stripe Cardivest.
The size on this model is 44" around, closed, and 25" in length from the shoulder. 100% merino. It will have 6 black buttons I think.
I have already begun knitting the next one with no seams this time, in multicolors of course. I have a large collection of multicolored yarns which I like to pair with solids and this design lends itself to that sort of combination.
Just FYI: the praying for rain worked and we had a real downpour with thunder and lightening and lots of resulting puddles today. Yay!


Thanks for sharing your design process. I love your interpretation of the shawl.
ReplyDeleteAny idea what the name of the shawl pattern is?
ReplyDelete