Friday, November 22, 2019

You gotta try this!

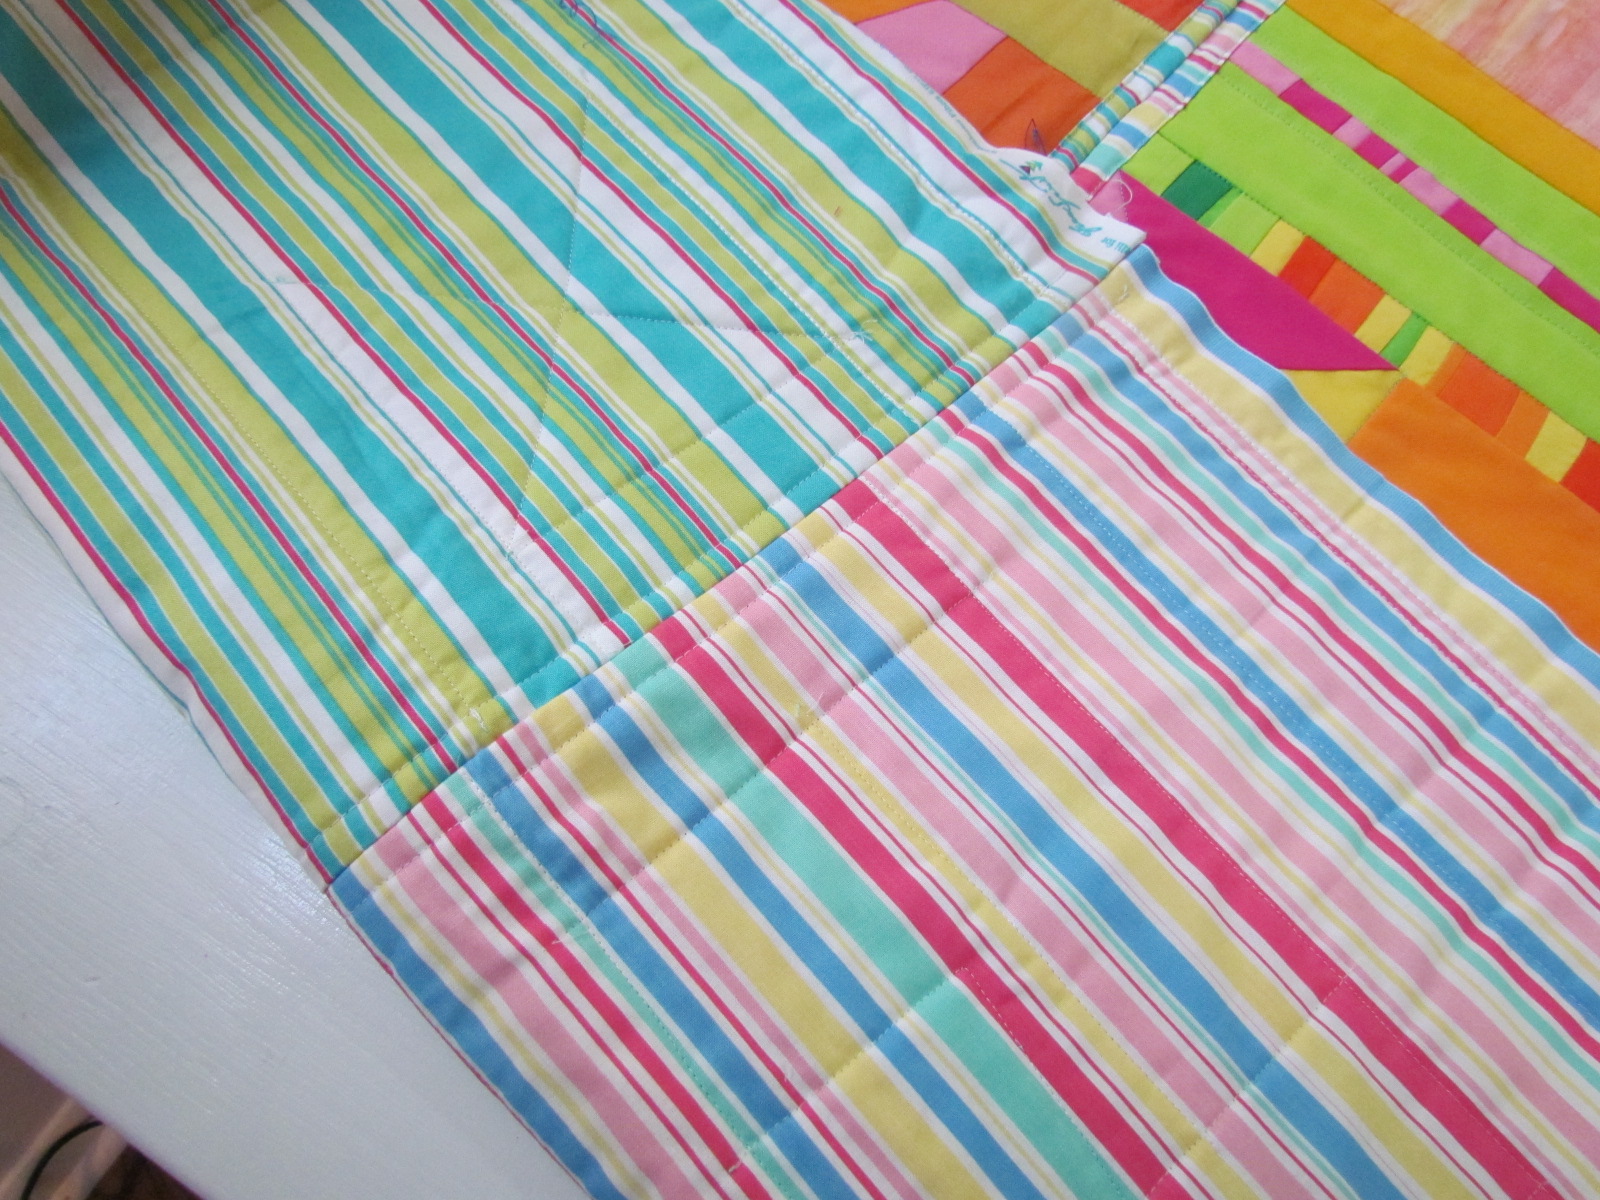
 OK, I am pretty excited. I figured out another way to quilt as you go. Here's my trial sample, two small blocks quilted and joined with my new and improved version III method. It really is so much better and easier (if I do say so myself). And they have been squared off before joining, which is also part of the improvement.
What you are looking at is a way to connect blocks or even larger sections of a quilt, with fabric to enhance the design, fabric that is special, that you don't want to waste by putting it on the back.  Version II used good backing fabric and only a small part of it showed on the front, which I felt was a waste of pretty fabric.
Here's an example of version II quilt as you go.  Using 'good' fabric for the backing and cutting it much larger than the blocks that were quilted onto it, the extra edges of the fabric was then used to join the two sections, and then folded over and quilted down. 
A problem occurs when quilting distorts the blocks and they can't be trimmed evenly, easily. But with my new version, III, you can quilt the blocks or lengths of blocks, trim them to the edge, so you know they are going to fit, and connect them, which is the next part I want you to see. This is the back side of two blocks joined with contrasting connecting strips. The backing fabric used here purposely for the sample was just some leftover pieces that didn't work, so no biggie. 
Here's what to do...after you have quilted your blocks, cut connecting strips in your desired fabric 1.5" wide and longer than the blocks you want to connect.

Sew the connecting strips onto the back of the quilted blocks with right sides together.
It's OK to leave a little extra on the strips which can be trimmed later after the two are sewn together.
 Turning the strips to the front, align the two blocks and sew together with a 1/4" seam. I found that it was necessary to put my foot right onto the block to get my needle as close to the edge as was possible. 
The two strips are sewn and ready to be turned under.

The strip is folded in half, pressed and pinned and then top stitched through all layers. 
 Three blocks joined. The strips can now be trimmed even with both blocks.
So what makes me happier with this method is:
1. trimming or squaring each of the blocks after quilting them individually
2. adding contrasting connecting fabrics to enhance the design
3. using appropriate backing fabric, or even multiple fabrics, having nothing to do with the design of the top.
4. this is not limited to sewing small blocks together. Panels would work just as easily, which is pretty much what I would do, as it would reduce the number of steps in joining the quilted parts.
5. quilting off the edge of the block and trimming it later. see reason #1.
Anyway, I have plans to do this method with the top I have up on the design wall, unfinished at the moment.
 By the way version one is on my old blog, http://fibermania.blogspot.com/p/quilt-as-you-go.html
As far as I am concerned, don't even bother with version II, just leap forward to version III and save yourself and your good fabric for the fronts of your work.

UPDATE:
 Four big blocks joined with complimentary connecting strips.


Saturday, November 9, 2019

For my own amusement

Warning: Knitting talk follows. For you non-knitters, just skip the numbers but come back for the story.

I saw this adorable bonnet on Ravelry and thought I could figure it out myself, and then was stumped. I got as far as imagining that one might begin with the ties (I-cord, simple enough) and then cast on for the ribbing...no that isn't right. OK make the mitered parts first then pick up stitches for the ribbing and then do I-cord all around, ending with the ties. Yes. So, figuring it out, I forgot about it.
++++
We had several doctor's appointments this week which I prepare for by gathering up some yarn and needles to pass the time. Yesterday I decided to use up all the little leftover balls of yarn that I was saving for scarves, where I like a bunch of different yarns to perk up a simple knit. I began this scarf thus:
Cast on 5 stitches.
Kfb, kfb,k, kfb, kfb. 9 stitches
K4, p1,k4.
Sl 1, kfb, k1, kfb,k1,kfb,k1,kfb, p1. 13 stitches
Sl 1, k5 p1,k5, p1
Continue thus: slipping first stitch, kfb, k to 1 stitch before center stitch, kfb, then knit center stitch, kfb, continue to one stitch before the end of row, kfb, p.
This pattern results in a lovely triangle which grows as tall and wide as you like.
 The back of the hat which was to be the beginning of the scarf, but then I remembered that bonnet. What if I started decreasing from this point on, would I make a nice pointy enclosed thingy? OK, so I decreased one stitch on each edge (after the initial slipped stitch) and two stitches before and after the center k stitch, which worked just as expected. 
 
By this point we had left the doctor's office and I was at home in front of the TV, obsessed with finishing this thing. It was a pointy hat which I figured needed to be longer in back, but not so much longer all around ( I have since changed my mind), so I just picked up stitches for the ribbing along the back which as you might recall is where I began. Then the ties. Hmm. OK so first I made some I-cord, long enough to work for one side and proceeded to attach-knit it to the hat itself, from the front, which was icky looking. Plan B. Starting on the other side, working with the wrong side and picking up and knitting the I-cord, looked much better, so I continued. I used up 7 little balls of yarn completely for this hat. I tried it on and it fit beautifully and then I looked in the mirror and laughed out loud. I looked like a crazy old woman, which I guess I am. Because I will wear this helmet to keep my head warm when I walk the dogs.
 This lovely young lady looks adorable wearing hers, altho she may have just been humoring the knitter.  Anyway, this hat falls into the category of Beat-up hats which I first blogged about here.


I got my lovely squirt bottle to model for me. I need one of those wig heads...anyway, I will give this one another try, since I think it would look cute on a young person, and definitely keep them warm. Hopefully they won't get beat up at recess just for wearing it.
I've been knitting hats for our church charity and brought ten of them to church already, but forgot to take pictures, but they weren't all that original and exciting, just warm and suitable for actually wearing. Here's more from this week, modeled on a roll of bathroom tissue:

  I love the decreases on this one. Hopefully one of these will be chosen by a boy. It's hard to think 'boy' when knitting these hats. I want to make them all pretty.
 This looks pointy-headed, but it settles down nicely when worn. Trust me.
 

This last one, I think I must keep for my own head. It is silk and a fuzzy merino and needs a bit of special care. Or that's my excuse for keeping it.

Tuesday, November 5, 2019

15 years at Blogging

Altho I have been a bit sporadic of late in posting, it is still the blog's anniversary and I feel like it has been such a part of my life's journey that I have to say something today.
I started blogging because...why was it? Needing to show what I made, or get 'out there' to promote my teaching, or finally, just to have someone to talk to. That ended up being the more important thing.
I got the idea from hearing David Sedaris talk about being a diarist. It seemed like a good idea to keep track of life this way. Years and dates are elusive, but pictures tell so much, so blogging about the garden, the quilts, the paintings, and knitting really helped me nail down my progress and/or struggles. And to have some reference for people to find the trick, the easy way, or the pattern made it easier for me to help or teach.
As I look back over the zillions of pictures I took for the blog, would you believe most are from gardening! Not this year, which being a drought from June on made the garden hopeless. O well. There's always next year, I hope.
I was looking at my Ravelry page the other day and saw someone had devised a better (raglan) sleeve for my often made Mitered Diamond Patchwork Jacket. I wrote the knitter, Lorna, and she sent directions. I am sharing her version here on the blog, if anyone is interested I will pass on her method.
+++++
Today I am returning to my knee doctor, where I had planned to report how wonderful my knees are doing, until yesterday when I carried a heavy flat screen tv downstairs and it was just too much for the right knee, the one that is bone on bone. So I suppose we will talk about surgery today. I am looking forward to not having to deal with this issue someday in the future.
And in other news, I must tell you a wonderful thing...walking the dogs last night at dusk, I was getting them out of my neighbor's yard two houses away, when I noticed in the window, which must be the dining room, a sewing machine and a yarn swift set up. !!! Right here just steps away from home, one of us! So I took the dogs in after their walk and went right over to find out the scoop. The lady, Bethany, was not home but her dad who she lives with said she was at handbell practice! I told him I have a sewing studio set up in our living room and a room upstairs is a yarn room. He said, O we have a yarn room too. Amazing. And she drives a Red car...a Camaro. Red cars in common too. I am weird or what?
I hope to find out more later today. Wouldn't it be nice to have a fellow fiber-ist right nearby?
Stay tuned for updates.

Saturday, November 2, 2019

Making Parts

Recently I have been teaching my Tuesday quilters about improvising a design. I didn't specifically announce my intentions, but just had them make some patchwork from black, white and red as a warm up. They were familiar with half square triangles and nine patch blocks so this wasn't a giant leap to make pinwheels and checkerboard panels. As they made the parts we added those to the design wall. Excitement ensued.

 I assembled the fabrics we would be using in coordinating solids, dots and stripes and had some smaller pieces that had been leftovers and those were also placed on the design wall.  When you are working with a limited palette, everything almost automatically goes together. Such was the case with these bits. Designing is easy when the patchwork parts are made first and the next bits just have to be cut to size to be added. If it is too small, add another fabric, or if it is too big, trim it to fit. The design began to take shape almost instantly. 
It was decided (by me) that we would make panels that could be quilted in the famous quilt-as-you-go technique, so we didn't sew the larger composed parts to each other, yet. Plus we have more to make, and decide on placement and what goes and what stays. It's a very forgiving process. I like that.

 Along those lines, I had a small collection of trial blocks and sample patches that have just been waiting in the wings, and now have been added to, as a way of making 'sourdough patches'. These are ingredients that grow as needed and could some day become jumping off blocks for new quilt tops. It's a way of using up more from the scraps that have accumulated in our mad sewing sessions. Just looking at them daily is an encouragement that nothing (hardly) is going to waste. Those long panels of twisty patches were donated to my collection. Thankfully, I didn't have to figure out how to make them myself.
In the evening, I have been trying to design a new hat. Here's my latest attempt. I managed to finish it, but it required SEWING, which is against my knitting religion. So while I do like the finished product, I didn't like the process, which means it is a one of a kind item. You win a few, you lose a few. The best part is using the leftover yarn. Hey, there's a theme here...