

Recently I have had several requests ( Okay... two) for information on my art techniques, or shall I rephrase and say an earnest desire to learn and/or be coached on artquilts. One wanted to be my understudy, which had me laughing since lately what I have been doing is sitting in my studio, knitting and watching Netflix. Some lesson!
Nevertheless, the (retired) teacher in me perked up because I am always interested in leading quilters astray, into the darkside, where we just cut and paste. Eventually we get to the sewing machine and quilt, but that's another whole topic.
It occured to me that there might be others out there, just coming into the concept of fusing, thanks to the wonder of Pinterest, and I might be speaking to a larger audience about these evil ways.
Rather than start from scratch with tutorials I luckily have lots of pre-posted tutes from the old blog.
So let's begin at the beginning:
This post first appeared in 2005.
Hi Melody,
I have a burning question about the fusing on your Matchstick pieces.
I've done a bit of fused applique but I've always stitched the pieces down to stop them peeling off the quilt later. I find the stitching causes unsightly fraying though.
Am I right in my assumption that you just fuse with no sewing? If so, do you use a special, extra strong fusible? I imagine it would require particular care when packing to send to shows etc.
Cheers
Claire
Dear Claire,
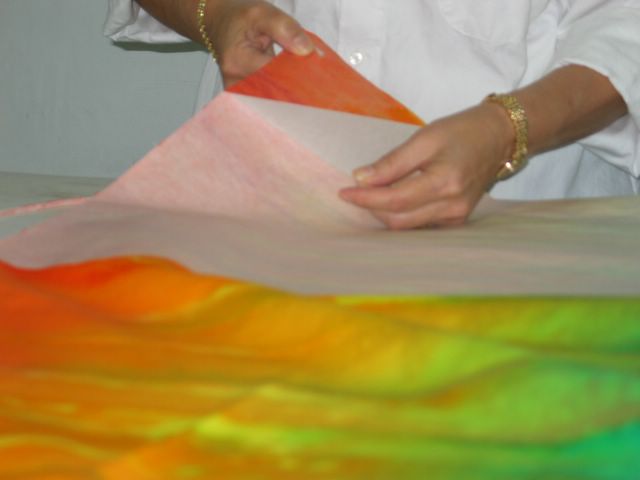
I use only regular Wonder-Under as my fusible. I only use hand dyed fabrics and that is why I am able to leave my edges free of stitching. Commercial fabrics have a factory applied coating like Perma-Press or Wash and Wear, or some such name, which acts like Teflon to the fusible. It peels up eventually or sooner. Hand dyed fabric (cotton or silk) has no such factory finish so the fine fibers of the fabric are open to receive the fusible web and will remain fused until you try to scrape them off with your fingernails. Please do not test this on my quilts! heehee.
I have had very good success over the 10 to 12 years that I have been making fused designs. Years ago when I showed my art quilt group Matchstick Moons, I notiiced that a few slivershad lifted and when I got home I re-fused them with a pressing cloth and hot iron. I did rush out without that final pressing since I was just then finished applying the 10 zillionth matchstick.

One more thing. I apply the Wonder-Under with a hot dry iron, ironing as though I were just trying to smooth out the wrinkles on a piece of fabric. Then I let the paper/fabric cool and then I peel off the paper. This is the big secret. I NEVER CUT THE FABRIC WITH THE PAPER STILL ATTACHED. I use very sharp scissors or rotary cutters to cut my designs. I feel that I am drawing my shapes with the cutting.
That way I needn't peel the paper off which causes fraying. The paper is saved and is referred to below as release paper.
I am not against fraying. Fraying distinguishes fabric from paper. If your fabric frays then make it really fray and make that a part of your artistic statement.
Commercial fabrics can be fused, but need to be either quilted down or edge stitched in order to safely remain attached.
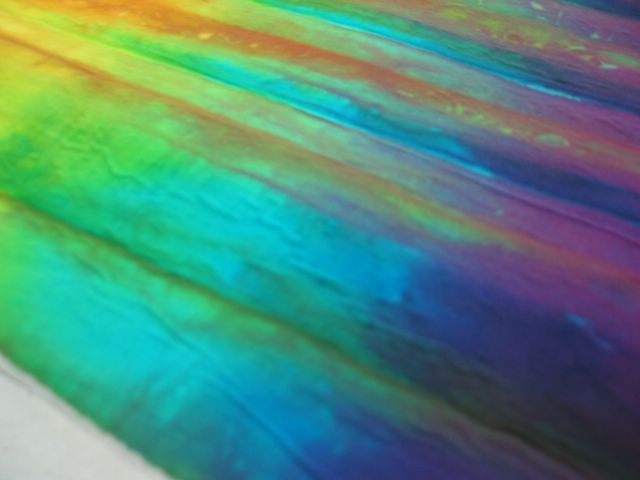
I also am aware that some hand dyed fabric such as heavier cottons or cottons with different weaves such as jaquards or twills will fray considerably even if I am very careful with my cuts. I love the look of sateen, but find that the twill weave is quite frayable. So I use silk instead, which give a good sheen and shows off the quilting nicely.
Since I fuse my fabrics together without using a base fabric, the trick is to use the release paper as a construction base. Using two fused fabrics, overlapping the edges just enough, say 1/8th inch, will produce a 'seam'. The release paper is reusable over and over again, until it gets dry and crackly. Then I will resort to using the teflon pressing sheets.
When the quilt top is complete I will fuse it directly to the batting. I only use Hobbs Heirloom Cotton 80/20 (Mr. Hobbs, this is a plug. How about sending me some free batting?) because it has a very smooth and nice finish and won't show on the top, especially with the fused silk.
I don't recommend using this method with Warm and Natural or White and Natural or other batts that have a noticeable texture. Disaster will result.

1. Cut the fusible to the width of your fabric.


2. Iron the fusible with a hot dry iron, moving the iron as though you were just ironing out the wrinkles.

3. Trim off the fabric selvedges or any fabric that isn't covered by the fusible web, unless you want to go back and patch that part later.
4. Pay close attention to fusing the corners, as they are the place one first peels off the paper. If the fusible isn't sticking to the fabric, then iron it again.
5. Bubbles may appear on the right side of the fabric but will disappear when they are fused after the paper is removed. Sometimes spots may be left, missing some of the fusible. Just patch the spot with another small piece of Wonder-Under. Make sure to cover the area being patched with the release paper so that nothing gets on your iron!
For more Q&A on Fusing see this post, http://fibermania.blogspot.com/2005/12/qa.html.

What a brilliantly amazing post!!!! Thanks you for sharing this with us and passing on the information about fusing.
ReplyDeleteLove your still life painting, The glaze, especially on the white jug, is glorious - just as if I'm looking at my white jugs on the kitchen bench.
Thanks for the information and the beautiful painting. Julie
ReplyDelete